
A modification of the orange-cranberry muffin recipe from the Post-Punk Kitchen makes a light, fluffy, fragrant treat!
Read More
Lilikoi Lovers Passionfruit Cupcakes (Lilikoi Frosting)
Part 3 of 3 - Part 1: Cupcakes, Part 2: Lilikoi Curd
Swiss meringue/7-Minute frosting is light, fluffy, and sweet without being cloying. It also suited my purposes - I wanted something that would be sweet enough to help balance out the tart flavor of the curd without overwhelming it. Because a very specific shade of blue was requested and I didn't want to take any chances with that, I used water instead of juice and vanilla bean-scented sugar instead of vanilla extract in the frosting I made for the wedding cake and cupcakes. With only the vanilla to flavor it, the frosting is like a high grade of marshmallow fluff - smooth, shiny, and melting on the tongue. With the juice to flavor it, there is an additional layer of fragrance and flavor to dance on the tastebuds. Both are delicious! Best used the same day it is made; can be put into pastry bags [piping bags] and refrigerated for a day or two with minimal deflating. If there are leftovers, you can use them to make a pavlova: spread a layer about 1" [2.5 cm] thick on parchment paper and bake on a cookie sheet at 250 °F [120 ℃ or Gas Mark ½] for about 1 ½ hours. Turn off oven and let cool. Serve topped with lilikoi curd, whipped cream, and assorted chopped fresh fruit (I like pineapple and berries).
Lilikoi Frosting (adapted from classic 7-minute frosting - there are many recipes out there; I printed out Paula Deen's recipe from the Food Network website, used the same proportions, but changed up the instructions to be based on temperature and appearance).
One batch will frost a 9" 4-layer cake or 24 cupcakes.
2 large egg whites
1 ½ cups [165 g] granulated white sugar [UK: caster sugar works better as it will dissolve faster. US: if desired, first measure and then grind the sugar finer in a blender or food processor]
1 Tbs corn syrup [or 1/4 tsp / 1 g cream of tartar - if not available, you can leave this out; the frosting will then be less stable and should be served as soon as possible]
1/3 cup [80 mL] fresh lilikoi (passionfruit) juice (or lemon juice, or water)
pinch of salt
1 Tbs [15 mL] vanilla extract
With electric hand-held mixer, beat egg whites on low for 1 minute. Beat in remaining ingredients. In a bain-marie or double boiler, beat on high until temperature reads 140 °F [60 ℃], then continue to beat on high for 7 - 8 minutes until soft peaks will stand on the surface. Remove from heat and continue beating on low for 2 minutes. Should be fluffy, smooth, and glossy. If it begins to separate after cooling (water visible in bottom of bowl under the fluff), it is undercooked and can be re-beaten over hot water to get it completely cooked.
Update (August 2019): for those looking for a lilikoi glaze, it’s super easy:
Lilikoi Drizzle or Glaze
2 cups [8 oz or 226 g] confectioners sugar (also called icing sugar and powdered sugar - fine sugar with cornstarch)
2 - 4 Tablespoons [about 30 - 70 ml] fresh lilikoi (passionfruit) juice
Stir the lilikoi juice into the sugar a spoonful at a time, until it’s the consistency you want. For a drizzle that will sit on top of a cake, use 2 Tablespoons of juice. For a glaze that soaks into the cake, use more. I test it on a corner of a cake to see how thick or thin it is. The total amount will depend on things like how humid it is in the room you are working in and how warm the cake is. If you want the drizzle to stand up and hold its shape, make sure the cake is completely cool first!
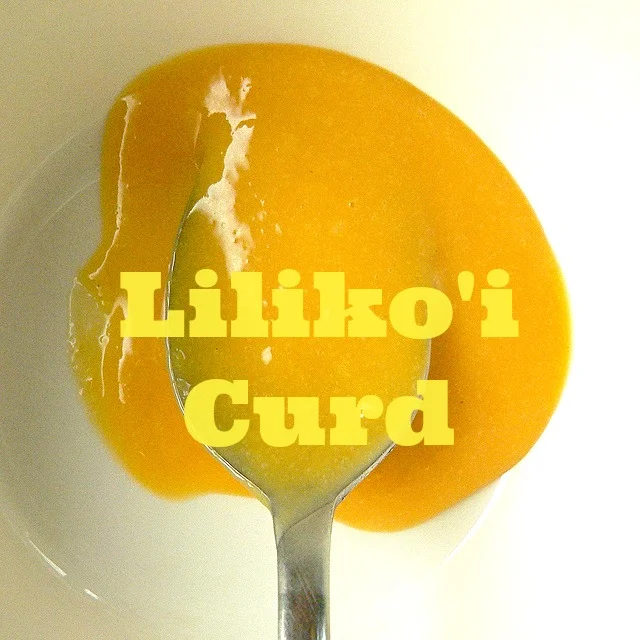
Lilikoi Lovers Passionfruit Cupcakes (Lilikoi Curd)
Part 2 of 3 - Part 1: Cupcakes, Part 3: Lilikoi Frosting)
It is currently lilikoi (passionfruit) season in Hawai'i, although it is getting close to the end - as of yesterday, Kokua Market still has some for sale (the farmers markets may have vendors selling the fresh fruit as well). I have been hoarding lilikoi pulp for months, getting fruit from my Mom Mom in Makaha and my hanai Mom in Manoa. Most of it got used for the wedding, but I do have some still stashed away. It won't last long, though. I've got a couple more recipes using lilikoi juice that are too good to save for special occasions!
Vegans: I'm working on a vegan lilikoi cupcake filling, and I'll post it when I get results I like. [update: never figured out a good curd, but now I have a jelly recipe using Pomonas Universal pectin - vegan and gluten-free - Lilikoi Lovers Passionfruit Jelly]
You really should use the freshest possible lilikoi juice for these recipes. About 5 - 6 fruits yield what I need for this curd recipe - I just cut them open (a serrated knife, like a breadknife or steak knife, works really well) and press the pulp through a mesh strainer. For a higher yield, heat the pulp up first, or give it a quick whirl in a food processor. If you have a Vitamix, you can blast the pulp, seeds and all, until smooth. This does NOT work well with a standard household blender - the broken seed pieces can be small enough to pass through a mesh strainer and still large enough to have jagged edges and be unpleasant to eat. The whole seeds are edible and in theory you could just leave them in - I did not want anyone at the wedding to bite into a cupcake and be alarmed by black spots in the center, though. If you can't get fresh, you can try frozen pulp (like Goya brand, available at many Latin/Hispanic markets) or Dafruta brand unsweetened passionfruit juice concentrate (also available in Latin/Hispanic markets - do not dilute, use it full strength. Mercado de la Raza in Honolulu carries it).
Lilikoi Curd Filling
heavily adapted from Ina Garten's lemon curd recipe in The Barefoot Contessa Cookbook
makes about 2 cups [480 mL] - enough to fill a 9" [23 x 3.5-centimeter] 3-layer cake or about 24 cupcakes
1/3 cup [70 grams] unsalted butter, at room temperature
3/4 cup [150 g] sugar
4 - 5 large egg yolks (4 for a softer, sauce-like curd, 5 for a thicker curd)
1 cup [250 mL] fresh lilikoi (passionfruit) juice
1 Tbs [15 mL] lemon juice (optional)
1/2 tsp [not sure how to convert this - a big pinch?] lemon zest (optional)
Cream butter and sugar together. Add remaining ingredients and blend. In a bain-marie (metal bowl set over pot of simmering water) or a double boiler, whisk frequently until
curd reaches 160 °F [71 ℃] (10 - 15 minutes). Curd will thicken further as it cools. Pour into bowl and press plastic wrap [cling film] onto surface so "skin" will not form. Refrigerate until completely cooled before using. Use within 3 - 5 days. Keep refrigerated.

Citrus Marmalade
[Note: I wrote this last year but let it languish in draft form until now; Dad and I have eaten our way through about half of what I made and it will be time to think about putting up another batch or two soon.]
I've been making small batches of preserves (this LA Times article, "Making jam in small batches (with big pleasure)" has been helpful with that) and stockpiling fruit that Mom has been cultivating. Dad and I enjoy tart orange marmalades with lots of peel, which are hard to find commercially in Hawai'i (believe it or not, Safeway Select brand Seville Orange Marmalade - the one that lists oranges as the first ingredient - is the best we've found in the stores here). Sometimes the way to get what you want is to do it yourself, right? This year is the first year that I've been able to do marmalade with Mom's citrus for a couple of reasons, one of them being that at this point, all of the children and grandchildren are living elsewhere and it's usually just Mom and Dad at home. It would have been next to impossible for Mom to have a surplus of fruit even just a few years ago - we would have been eating it right off the trees. She's also been able to spend more time gardening now that there are no children to tend to (and I think Mom likes it that way - plants don't talk back, ha ha).
I've been out there on the weekends lately, doing some home renovation work for them (4 kids will really take a toll on a house), doing prep work for my brother's wedding, and going through Mom's fruit harvests. I've adapted a recipe from John Thorne's book Mouth Wide Open (Maximum Marmalade), which uses sliced fruit that has been macerated in juice from additional fruits. The best-looking fruits get sliced and the not-so-great fruits get juiced and so far that has been working out. Stored in the freezer until I have enough fruit and time to make a pint or two, I've made three batches so far and I think I've worked out the right proportions of fruit to sugar to suit my taste and Dad's. I'm also hot-water canning so that we'll have a supply all year, hopefully.

If you try this recipe, keep in mind that it's more of a general guideline and I've been aiming not only for my particular preference in flavor, but also for the types of citrus I'm using. A big part of the flavor for me is the familiarity of it - the taste is distinctly of the citrus fruits Mom grows and that I've consumed for decades. I don't use additional pectin, so some batches don't get as thick as others (hence using the instant-read thermometer - "jelly test" and "sheet test" don't work so well for me). The amount of sugar varies depending on the sweetness of the citrus fruits, and sometimes I use local honey for part of the sugar. Mom has yuzu (citron), limes, sweet oranges, calamansi (sour oranges), grapefruit, and jabon (pomelo/pummelo). They aren't all in season right now, so the batches I've made have been mostly sweet orange with limes, calamansi, and yuzu. I get started at least the night before so the fruit can sit in the juice and sugar for several hours. This does not seem to be strictly necessary; I made a batch right away once and the results were certainly edible but the peel didn't get quite as tender.
This recipe presumes that you are already familiar with making jams and jellies and hot-water canning (there are a lot of resources available online and at your local public library if you are not). If you don't want to can it, you can just pour it into clean glass jars, ignore the "process for 15 minutes" and store it in the refrigerator.
1 kg sliced citrus and juice (when the fruit is in a bowl, I add enough juice to cover the fruit)
700 g Maui gold sugar (this has a higher molasses content and adds more of a caramelized flavor to the finished marmalade)
muslin jelly bag or cheesecloth
5 eight ounce (half-pint) canning jars with lids, sterilized (you might wind up using only 4 jars - seems to depend on how much liquid evaporates during cooking)
instant-read thermometer
wide-mouth funnel (because getting boiling hot marmalade on yourself is no fun at all, ask me how I know)
Quarter and thinly slice the best-looking fruits into a bowl (Dad and I like a mix of thick and thin - most get sliced about 1/8" cm thick, some get sliced 1/4"/.6 cm thick). While slicing the fruit, remove any and all seeds and set aside. Whatever you wind up with, put into a jelly bag or wrap up in the cheesecloth and secure it. This goes into the bowl of sliced fruit and then saucepan along with the fruit and gets removed at the end (this is to extract as much pectin as possible). Juice the rest of the fruits and pour over the sliced fruits. If there isn't enough juice to cover the slices, add water. To make small-batching easier, I weigh out the sliced fruit and juice as I go, so that each freezer bag or container is 1 kilogram (whatever is left over stays in the freezer until the next round of slicing and juicing).
Add the sugar to the bowl of fruit and juice, cover, and leave in the refrigerator for several hours or overnight.
In a large saucepan, heat the fruit and sugar over medium heat, stirring frequently to prevent sticking and burning. Cook to 220 degrees Fahrenheit. Remove the bag of seeds if you have one in there. Pour into jars, leaving 1/4"/.50 cm clearance. Process for 15 minutes.
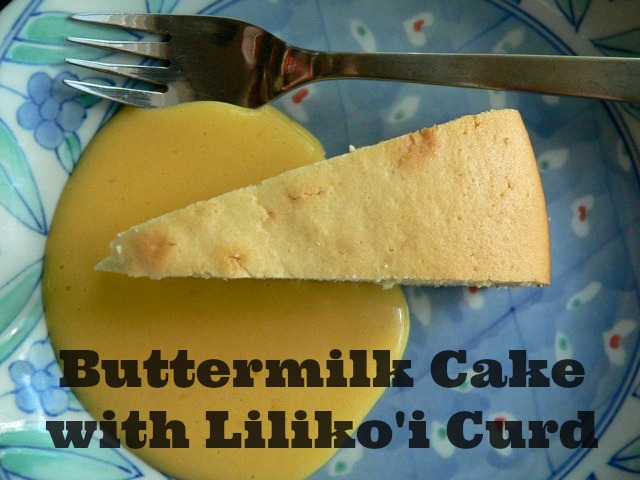
Vanilla Buttermilk Cake with Lilikoi Curd
While reading A Homemade Life, one of the recipes that I immediately bookmarked was the Vanilla Bean Buttermilk Cake. I had been asked to do a cake and a cupcake tower for a wedding, and the requested flavor: liliko'i! (that's passionfruit for those of you not familiar with the Hawaiian name). By the time I was reading A Homemade Life, I'd already read through several recipes for liliko'i cakes, all of which called for starting with a box mix and juice concentrate and I was hoping to find a way to bring in more liliko'i flavor.
The primary request: make them delicious. Make the cupcakes pack a big flavor punch - something to get people to stop for a moment and be wowed. With that in mind, I started thinking about using a liliko'i filling, and chose to modify the Vanilla Bake Shop's Meyer Lemon Curd recipe. There is a version of the Vanilla Bean Buttermilk Cake recipe on Orangette, Molly Wizenberg's blog. It's not exactly the same as the book version, with one difference being that the online version uses a combination of baking soda and baking powder, and the book version calls for 1 Tablespoon of baking powder. That seemed like a LOT of baking powder to me, but I went ahead and used it, and the cake turned out just fine. Because I'm currently living in a house with an old and cranky oven, I am doing all my cake recipe testing over at Mom & Dads, and they have been happy to be my tasters. When I pulled the cake out of the oven, I already knew that this was not going to be the cake recipe for the wedding, and slicing and tasting confirmed it. While I tried to get specific about why (the best I could come up with initially was "it's good cake, just not wedding cake") I kept eating it, and then I speared a chunk with my fork, swept it through the puddle of lilikoi curd on my plate, popped it into my mouth, and found that with the lilikoi curd on it, I don't care. WOW. This is good curd. Back to the specifics of why it won't be wedding cake - in the book, Molly does say it is best on the day it is made, and I agree, having sampled the cake the day after and then the day after that. I'm planning to make the layers ahead of time and freeze them, so I need something that will hold up better in storage. Mine wound up with several big air bubbles in it (and based on photos I've seen online, this is pretty common). Those can be dealt with either by taking the pan of batter and giving it a couple of good firm whacks on the kitchen counter (risking splattering cake batter all over the place) or by sweeping a thin-bladed knife or a skewer back and forth through the batter in the pan, before putting it in the oven.
Modifications: because I didn't have a vanilla bean, I used only vanilla extract and I suspect that it just didn't pack the same punch. If I make this again, I'll be sure to use the vanilla bean. I still don't have parchment paper, and I think I've got a springform pan but I couldn't find it, so I buttered and floured a regular cake pan generously. The cake didn't stick and turned out of the pan easily; however, I suspect it wound up being a little denser as a result, because the cake couldn't climb up the sides of the pan as easily as it might have with just butter. I didn't do the Glazed Oranges that are paired with this cake recipe since I was making the lilikoi curd.
The lilikoi butter has a wonderful flavor, fruity and floral at the beginning with a nice tangy finish. It's sweet without being cloying. The texture is surprisingly light and the mouthfeel is actually a bit fluffy, which some people like a lot (I'm not as big a fan of this, but that didn't stop me from eating several spoonfuls). This is also not the recipe that will wind up in the wedding - it is too runny for what I have in mind, although it does firm up some after refrigeration. I will be making it again, though. If you try it, do keep in mind that this makes a big batch, and the recipe says it will keep for 3 - 4 days in the fridge.
Vanilla Bake Shop's Meyer Lemon Curd (via Martha Stewart)
Modifications: replaced the lemon juice with fresh liliko'i juice (cut open several lilikoi and press the pulp in a fine mesh sieve, discarding the seeds. Alternately, if you have access to a Vitamix, blend the pulp until the seeds are ground into fine specks - they are edible and contribute to the flavor nicely). I did use lemon zest but I think this could be left out. The recipe calls for putting it through a fine mesh sieve; I didn't and the texture didn't seem to suffer at all.