originally posted on my old blog, Sept. 2005. Lady Linoleum has a free crochet pattern for fried egg wrist warmers, and be sure to take a look at her amazing bacon wrap!
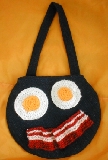
CROCHET Bacon and Eggs, Adapted from the 1979 Jackie Magazine Fry-Up Knitted Handbag Pattern, thanks to the Cult 45 Bookshop (website appears to be down as of 2006 - Craftster.org's "Crafts Gone Bad" has some photos).
Abbreviations:
sl = slip
ch = chain
sc = single crochet (American)
hdc = half double crochet (American)
dc = double crochet (American)
MC = main color
CC = contrast color
Gauge: 20sts/16rows = 4”/10cm
Notes:
No yarn amounts given – small enough so that I use scraps.
Eggs: Leave long tails with the MC and then stuff the tails into the back of the yolk to keep it supported.
Bacon: Size can be adjusted easily
EGGS
Large eggs (roughly life-size)
G/6 4.25mm hook
Worsted weight yarn, yellow[MC] and white[CC]
Chain 5, join to form loop
1. 2 hdc in ea st
2. 2 hdc every 2nd st
3. 2 hdc every 3rd st
4. 2 hdc every 4th st
5. work 1 round even
6. switch to CC. 2 hdc ea st.
7. 2 hdc every 2nd st
8. 2 hdc every 3rd st
9. 2 hdc every 4th st
Small eggs (about 3” diameter)
G/6 4.25mm hook
Worsted weight yarn, yellow (MC) and white (CC)
Ch 6, join
1. single crochet twice in each (12)
2. join with sl st, ch1. hdc in first st, hdc twice in every 2nd st
3. join with sl st, ch1. hdc in each st.
4. join with sl st, ch1. *hdc in two sts, hdc twice in 3rd st*
5. join with sl st. Using CC, ch 1. 2 hdc in ea st.
6. join with sl st, ch1. hdc in first st, hdc twice in every 2nd st
7. join with sl st, ch1, hdc twice in every 3rd st
BACON
G/6 4.25mm hook
Worsted weight yarn, dark red [MC] and cream [CC]
With MC, ch 52
1. dc in 3rd st fr hk. dc all rem
2. change to CC, cut MC. Ch1, single crochet all.
3. ch1, sc all sts
4. change to MC, cut CC, leaving a tail at least as long as the piece. Ch1, sc all.
5. ch1, sc all sts
6. change to CC, cut MC. Ch2, dc all.
7. Ch2, dc all sts.
8. change to MC, cut CC, leaving a tail at least as long as the piece. Sl st all.
Cut yarn and weave in MC ends.
Using a tapestry needle and the long tail of CC, do a running stitch through the CC rows: on the right side, the width of one stitch, on the wrong side, the width of 3 – 10 stitches (try to make it fairly random). Repeat with the second tail. Pull gently on the tail ends, gathering the bacon into ruffles. Adjust to your preferred look and knot the tail ends.
For the bag:
I’m explaining what I did – not the best tute in the world, and one that probably explains why I have some trouble with sewing. If you have trouble understanding the instructions, I can’t help you, even if you are crying with frustration. It’s glaringly obvious that I’m a mostly self-taught sewer and learned at an early age. Some of the things I do would only make sense to a 7-yr old.
I chose denim for the outside and upholstery fabric for the lining; I didn’t measure the fabric, since I was using remnants – folded the fabric in half, put a dinner plate on it to see if I had enough.
I traced around a dinner plate with chalk onto the back of the fabric and added a 1/2” seam allowance (2 pieces of each fabric per handbag). For the single strap, I cut a strip 5” wide, folded the edges into the center, folded it over again, and sewed it closed. For the two straps, I did the same thing but with a shorter piece of fabric (I was almost out of fabric at this point).
It would probably be more efficient at this point to sew on the eggs and bacon, but I got nervous and sewed the lining pieces and outside pieces, right sides together and half the circumference of each, seams snipped. Because I stuffed the yolks, I hand-sewed around the yolks first and then around the edge of the whites. The bacon gets arranged and pinned into place, then the sections touching the bag were stitched down, again by hand.
Please note that there are better ways to sew the lining into a handbag. I turned the outside piece inside out so that the public face was out, and for the complete circle, carefully ironed and snipped the seam allowances. For the handbag with the long strap, I turned the hem down for the top and trimmed it. Then I slid the linings (public face in) into the bags and pinned them together, then slid the ends of the strap(s) between the lining and bag, adjusted them to the desired length, and then pinned them into place and carefully top-stitched the lining in. I managed to do a zig-zag stitch over the side seams of the bags for reinforcement and to keep the lining secure; don’t ask me how.