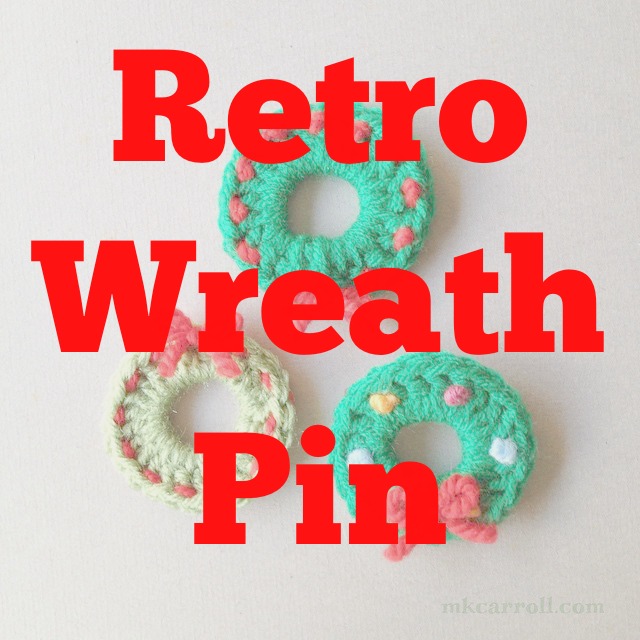
Super quick and easy crochet pattern for a classic wreath pin or ornament!
Read More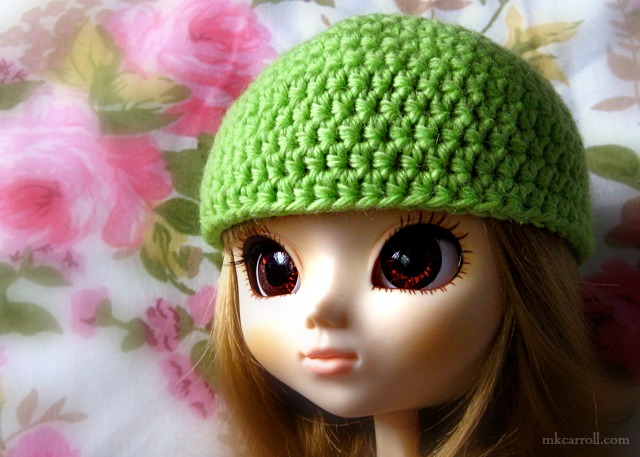
Basic Crochet: Doll Hat Pattern
A simple crocheted beanie for a Pullip doll, using a sportweight yarn. This was a really quick project, one that's going to be easy to fancy up with appliques, ear flaps, pompons, all that sort of thing.
Tools & Materials
DK or sportweight yarn
crochet hook C/2-2.75mm
Pattern
Make a slip knot loop and sc 6 sts into the loop; tighten loop.
Begin increases:
1) 2 hdc into each st (12 stitches total)
2) *1 hdc, inc 1* (18 stitches total)
3) *2 hdc, inc 1* (24)
4) *3 hdc, inc 1* (30)
5) *4 hdc, inc 1* (36)
6) *5 hdc, inc 1* (42)
Stop increasing. Start checking the fit after row 10 to get the length you want.
7 - 13) hdc ea st
Done!
This is such a very very basic pattern that if you want to use it to make hats to sell, go right ahead. I'd love to know about it (and I can point potential customers your way too!).
Images and text © M.K. Carroll 2006
Free Peaches & Creme/ Peaches n Creme/ Peaches and Cream Yarn Patterns
August 2019 update: many of these links are now inactive. Some changes include another company, Spinrite, purchasing the rights to the name. If you are looking for sources of the Elmore Pisgah Peaches & Créme yarn, you may be able to find some available for sale in Ravelry.com’s Stash Search feature, Etsy, and eBay. There are over 1,000 free patterns that use Peaches & Creme yarn on Ravelry.com! It’s free to set up a Ravelry account.
It looks like you can tell the difference between the original yarn and the current yarn by the label. The original Elmore Pisgah/Pisgah Yarn & Dyeing Peaches & Créme label has a white pitcher next to a peach, and was made in the United States of America. The Spinrite Peaches & Créme label has a large picture of a peach on the label and is made in Canada.
I pay attention to the searches that bring people to this blog, and searches for free patterns using Peaches & Creme yarn are piling up! I mentioned it in my post about Craft Shops with Yarn: Honolulu, and that seems to be what brings it up in searches.
The manufacturer (Elmore Pisgah) offers free patterns on their website and spells it "Peaches & Créme" with an accent mark over the first e in Creme, which may or may not help you in additional searches for free patterns. You can buy skeins and cones of Peaches & Creme online at www.peachesandcreme.com.
A review of cotton yarns in the Aug/Sept 2005 issue of Crochet Me includes Peaches & Creme, if you are interested in learning more about the qualities of the yarn and how it compares to other cotton yarns (Lion Brand Lion Cotton, Lily Sugar 'n Cream, Bernat Cottontots, and Classic Elite Sand). The most popular use for Peaches & Creme seems to be dishcloths, and there is a Mason-Dixon KAL for the Mason-Dixon Knitting Book, and at least one KALer has posted a free dishcloth pattern of her own. More free dishcloth patterns (knit and crochet) can be found at the Dishcloth Boutique. Bonnie-Marie Burns of Chic Knits recently posted on her blog about using Peaches & Creme for a sweater pattern that called for Rowan Handknit DK Cotton, quite illustrative of how you need not limit yourself to patterns which call specifically for Peaches & Creme yarn. Websites like Craftown, Crochet Pattern Central, Crochet Memories, and Knitting on the Net all offer loads of free patterns, many of which use worsted weight cotton yarn. My own Crochet Bacon & Eggs handbag (adapted from a knitting pattern originally published in a 1979 issue of Jackie magazine) can be made with any worsted weight yarn as well.
(this post was edited on December 15, 2015, to make updates and corrections)
Crochet: Bacon and Eggs Handbag
originally posted on my old blog, Sept. 2005. Lady Linoleum has a free crochet pattern for fried egg wrist warmers, and be sure to take a look at her amazing bacon wrap!
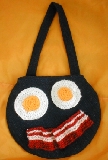
CROCHET Bacon and Eggs, Adapted from the 1979 Jackie Magazine Fry-Up Knitted Handbag Pattern, thanks to the Cult 45 Bookshop (website appears to be down as of 2006 - Craftster.org's "Crafts Gone Bad" has some photos).
Abbreviations:
sl = slip
ch = chain
sc = single crochet (American)
hdc = half double crochet (American)
dc = double crochet (American)
MC = main color
CC = contrast color
Gauge: 20sts/16rows = 4”/10cm
Notes:
No yarn amounts given – small enough so that I use scraps.
Eggs: Leave long tails with the MC and then stuff the tails into the back of the yolk to keep it supported.
Bacon: Size can be adjusted easily
EGGS
Large eggs (roughly life-size)
G/6 4.25mm hook
Worsted weight yarn, yellow[MC] and white[CC]
Chain 5, join to form loop
1. 2 hdc in ea st
2. 2 hdc every 2nd st
3. 2 hdc every 3rd st
4. 2 hdc every 4th st
5. work 1 round even
6. switch to CC. 2 hdc ea st.
7. 2 hdc every 2nd st
8. 2 hdc every 3rd st
9. 2 hdc every 4th st
Small eggs (about 3” diameter)
G/6 4.25mm hook
Worsted weight yarn, yellow (MC) and white (CC)
Ch 6, join
1. single crochet twice in each (12)
2. join with sl st, ch1. hdc in first st, hdc twice in every 2nd st
3. join with sl st, ch1. hdc in each st.
4. join with sl st, ch1. *hdc in two sts, hdc twice in 3rd st*
5. join with sl st. Using CC, ch 1. 2 hdc in ea st.
6. join with sl st, ch1. hdc in first st, hdc twice in every 2nd st
7. join with sl st, ch1, hdc twice in every 3rd st
BACON
G/6 4.25mm hook
Worsted weight yarn, dark red [MC] and cream [CC]
With MC, ch 52
1. dc in 3rd st fr hk. dc all rem
2. change to CC, cut MC. Ch1, single crochet all.
3. ch1, sc all sts
4. change to MC, cut CC, leaving a tail at least as long as the piece. Ch1, sc all.
5. ch1, sc all sts
6. change to CC, cut MC. Ch2, dc all.
7. Ch2, dc all sts.
8. change to MC, cut CC, leaving a tail at least as long as the piece. Sl st all.
Cut yarn and weave in MC ends.
Using a tapestry needle and the long tail of CC, do a running stitch through the CC rows: on the right side, the width of one stitch, on the wrong side, the width of 3 – 10 stitches (try to make it fairly random). Repeat with the second tail. Pull gently on the tail ends, gathering the bacon into ruffles. Adjust to your preferred look and knot the tail ends.
For the bag:
I’m explaining what I did – not the best tute in the world, and one that probably explains why I have some trouble with sewing. If you have trouble understanding the instructions, I can’t help you, even if you are crying with frustration. It’s glaringly obvious that I’m a mostly self-taught sewer and learned at an early age. Some of the things I do would only make sense to a 7-yr old.
I chose denim for the outside and upholstery fabric for the lining; I didn’t measure the fabric, since I was using remnants – folded the fabric in half, put a dinner plate on it to see if I had enough.
I traced around a dinner plate with chalk onto the back of the fabric and added a 1/2” seam allowance (2 pieces of each fabric per handbag). For the single strap, I cut a strip 5” wide, folded the edges into the center, folded it over again, and sewed it closed. For the two straps, I did the same thing but with a shorter piece of fabric (I was almost out of fabric at this point).
It would probably be more efficient at this point to sew on the eggs and bacon, but I got nervous and sewed the lining pieces and outside pieces, right sides together and half the circumference of each, seams snipped. Because I stuffed the yolks, I hand-sewed around the yolks first and then around the edge of the whites. The bacon gets arranged and pinned into place, then the sections touching the bag were stitched down, again by hand.
Please note that there are better ways to sew the lining into a handbag. I turned the outside piece inside out so that the public face was out, and for the complete circle, carefully ironed and snipped the seam allowances. For the handbag with the long strap, I turned the hem down for the top and trimmed it. Then I slid the linings (public face in) into the bags and pinned them together, then slid the ends of the strap(s) between the lining and bag, adjusted them to the desired length, and then pinned them into place and carefully top-stitched the lining in. I managed to do a zig-zag stitch over the side seams of the bags for reinforcement and to keep the lining secure; don’t ask me how.